Lesson: Hyperspectral Images
About the Data:
The data for the ENVI tutorials are found in the class/gly560/class/envidata
directory.
About the Lesson:
This lesson will consist of completing two ENVI tutorials, with some minor
additions (to be turned in):
- ENVI Tutorial Number 12: Introduction
to Hyperspectral Analysis
- This tutorial will gives a nice introduction to spectroscopy, particularly
with respect to mineral identification. You'll work with "famous"
AVIRIS data from Cuprite, Nevada.
- ENVI Tutorial Number 13: Basic Hyperspectral
Analysis.
- This tutorial is gives and introduction to the ENVI tools for handing
hyperspectral data, and provides an opportunity to work with library spectra.
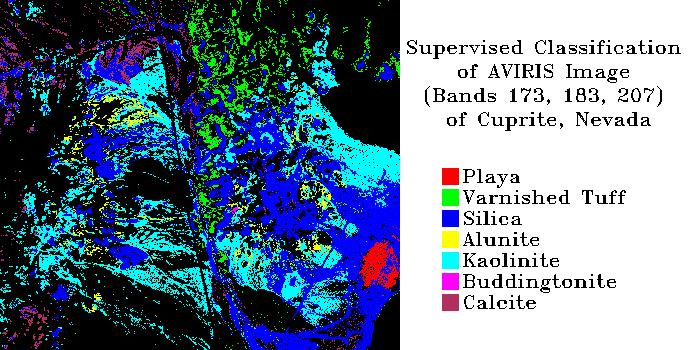
- Create a classification map based upon the results of ENVI tutorial 13.
- At the end of Tutorial 13, you work with a region of interest file:
cup95_av.roi. Use this ROI file, along with a parallelpiped classification
tool, to classify the into the class distinguished by the ROI.
- FIRST read the ENVI user help files on supervised classification and
the parellelpiped method.
- Use parallelpipeds with a 2 standard deviation distribution. You do
not need to generate rule images, unless you want to inspect them.
- Use Overlay ->Classify-> to create a Map Key for the image. Expand
the boarder of the image (by about 250 pixels) to allow the map key to
be placed next to the image. Add a title, your name, and save the image
as a jpg file.
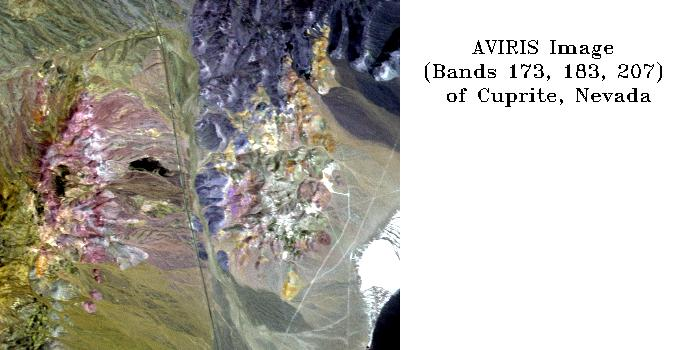
- Prepare an identically dimensioned image using AVIRIS bands 183, 193,
207 for RGB. Save this image also as a jpeg file.
- Import both jpg files into an html file, placing one image below the
other. Publish the page to your home directory. Browse the file and compare
the two images. Does the classification make sense? Are there obvious
mistakes in the classification?
- Print the page, and make sure that the url appears on the page. Note,
in pen or pencil, and problems that you identified in the classification.
Turn this page in.