The NAPP digital ortho quads are named according to the following convention:
- "Quadname" = Parent quadrangle name derived from the Dept. Of Transportaton (DOT) naming convention, including areas outside of New York if available. USGS names were used if a DOT name was not available
- "Quarter" = The Quadrant of the Quadrangle relative to compass directions, ie NW, SE
- "_tile" = The quarter section of the quarterquad, numbered beginning in the upper left section and proceeding clockwise
Example:
BrewsterNE_tile0.sid
They are provided in MrSid format, which is readable by ArcGIS. Rather than download these data from the website, obtain the tiles in exactly the same format from the class directory: /nsm/class/gly560/class/MachiasCatalog/. Data are in the NAPP directory in native format, or as a winzip file NAPP.zip or a tarball NAPP.tar.gz. Create a working directory in your class work space called MachiasCatalog and copy the data into a new directory called MachiasCatalog/NAPP.
We want to create a geodatabase to manage these NAPP data. In addition, we will eventually want to import vector and raster data from our previous exercise into the geodatabase.
Create a personal geodatabase in your working directory called Machias.
Before you create the raster catalog, you will set its spatial reference. Note that the NAPP data are in NAD83 UTM 18N. In ArcToolbox, right-click anywhere in the white area of the window and choose Environments. In the Environment Settings dialog box, expand General Settings.For Output Coordinate System, click the drop-down arrow and choose As Specified Below.Click the Properties button .In the Spatial Reference Properties dialog box, choose NAD83 UTM 18N coordinates. Use the defaults for the other settings. Click OK to close the environment settings.
You are now ready to create the raster catalog.In ArcToolbox, open the Create Raster Catalog tool (found in the Data Management Tools > Raster toolset). For Output Location, browse to your Machias.mdb geodatabase. For Input Raster Catalog Name, type Machias_Raster. .Notice that the Coordinate system for the raster and geometry column property is using the environment setting you set earlier. When storing geometry, the spatial domain should also be set. Click the Properties button next to Coordinate system for the geometry column.Click the X/Y Domain tab.
In the Create Raster Catalog tool, click the drop-down arrow next to Raster Management Type and choose Unmanaged. You may need to scroll or enlarge the dialog to see the drop-down list.
Remember, when you choose to make a raster catalog unmanaged, the catalog does not store actual data; it only maintains a path to the raster data. The benefits of this option are speed and efficiency.
Click OK to execute the Create Raster Catalog tool. In the Catalog tree, expand the Machias.mdb geodatabase and click the Machias_NAPP raster catalog. Click the Contents pane, and notice the raster catalog is empty.
Now we need to bring the data into the catalog. Right click on the new raster catalog. Choose Load and then Load data. Select all the raster data in your NAPP folder and click OK. Because you are loading four large rasters into the raster catalog, the process may take a few minutes to execute. Loading data into a managed raster catalog would take longer, due to the data conversion that takes place.
Now when you click on the contents tab in the raster catalog it should display all the NAPP data. Click on the Preview tab and you should see a mosaic of all the data. At the bottom of the Preview tab window, change the Preview to Table. In the Raster column, notice that instead of displaying values, the word Raster appears. This is because your raster catalog is stored in a personal geodatabase and is not managed by the geodatabase. The word Raster indicates the reference to the actual raster data.The Shape_Length and Shape_Area fields are added by the geodatabase to store the perimeter and area of the footprints.Return to the Contents pane.
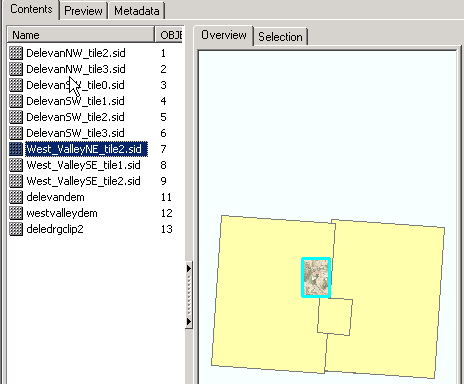
On the right edge of the Contents window, click the Expand Window button ![]() to open the raster catalog browser. The Overview panel displays the footprint for each raster dataset in the raster catalog.In the Contents panel, select the raster at the top of the list. The raster is highlighted in the Contents panel and displayed in the Overview panel.
to open the raster catalog browser. The Overview panel displays the footprint for each raster dataset in the raster catalog.In the Contents panel, select the raster at the top of the list. The raster is highlighted in the Contents panel and displayed in the Overview panel.
Now we will bring in the raster data from the previous exercise into our catalog. Create new folders in your workspace called DEM and DRG. Copy your Delevan and West Valley DEM's from the previous exercise into the folder. Then import the clipped DRG from the previous exercise into the catalog.
When you preview the data, you should see that your DEM and NAPP data cover a much larger area than the clipped DRG. One of the reasons you might want to create a raster catalog is to be able to view and manage your data in this way. In an unmanaged catalog, you are free to clip datasets and then import the modified raster data into the catalog to see how it relates spatial to the rest of your data.